

You CAN Repair a Bad Motherboard Yourself. Here’s How to Do It
Share
If computers have been buildings, then a motherboard might be their basis. A true foundation always assures strong performance. As computers have become smaller, faster, and quieter, diagnosing them, especially motherboards, has become problematic.
TAGGED UNDER: Computer Motherboard
The easy solutions are as clean as they’re traumatic. You have two options: replace damaged or all capacitors or MOSFETs and hope for the best, or replace the motherboard or the defective external part.
It is difficult to get a piece of technology to work as properly as it used to as soon as it’s damaged, which is why maximum ‘restore’ methods stay with hardware enthusiasts. The quality alternative for most other clients is to replace it. With that in mind, we look at our assets and try to get the most out of them.
:max_bytes(150000):strip_icc()/GettyImages-1267327926-7d1724acc0504c8391f4e08bd8f150e9.jpg "You CAN Repair a Bad Motherboard Yourself. Here's How to Do It 2")
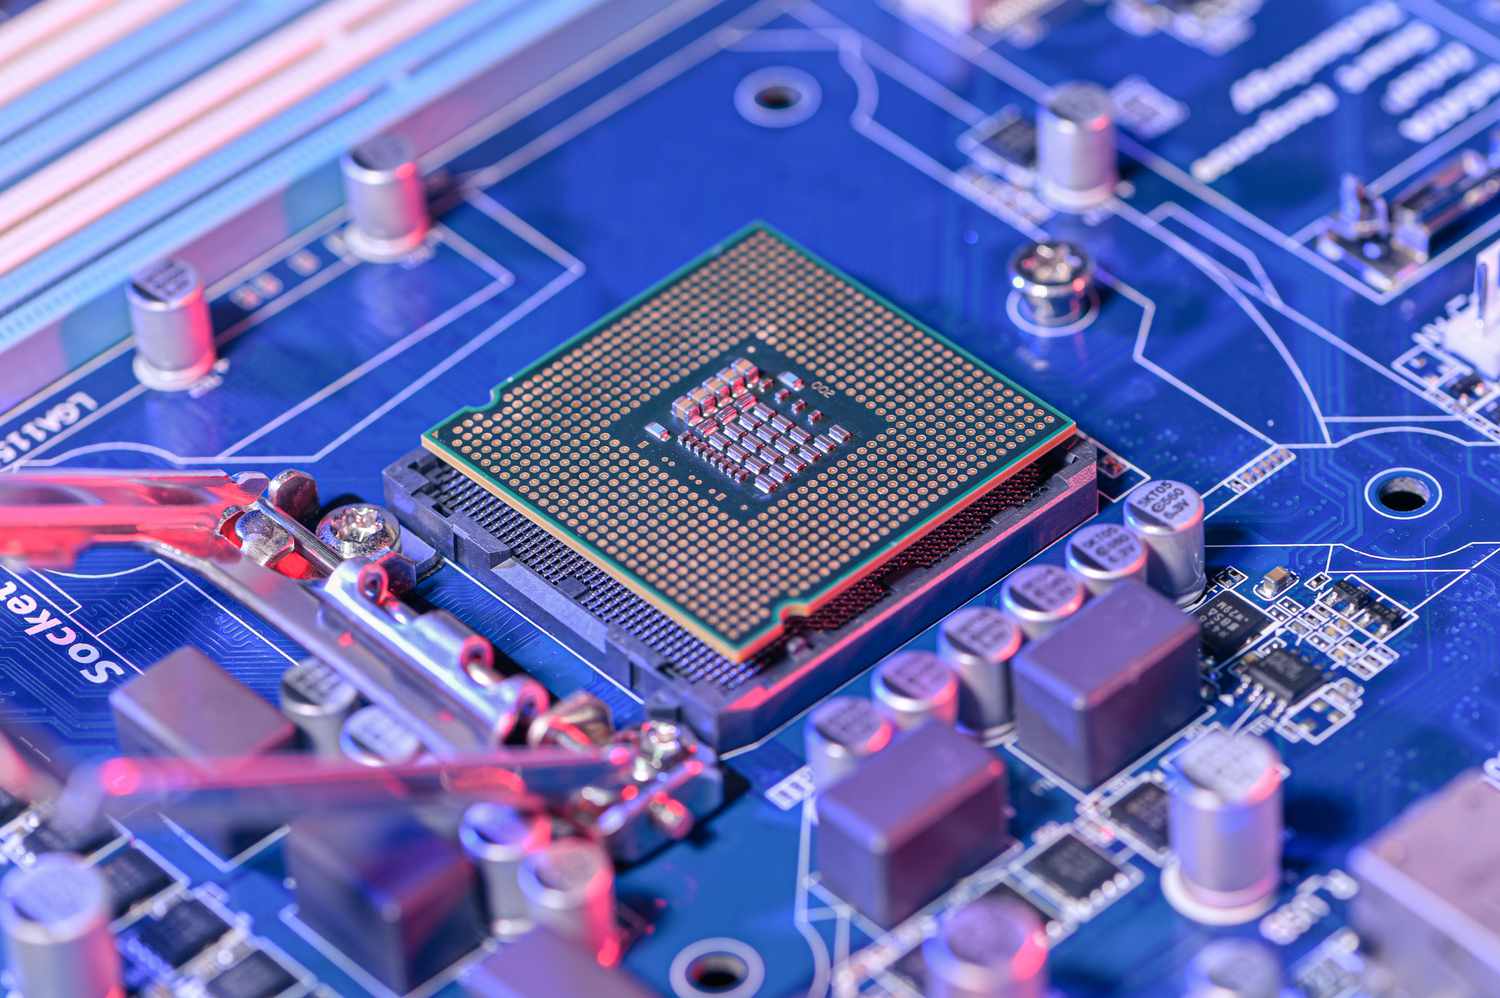
The motherboard is placed inside the cabinet and includes a microprocessor, chipset, and BIOS (Basic Input/Output System). The microprocessor decides the sort of Central Processing Unit (CPU). The chipset constitutes two bridges: the northbridge and the southbridge. These bridges manage the waft of records in the computer. The simple functioning of the laptop is managed using the BIOS, which is an actual time clock and a major issue of the motherboard. The slots and ports on it join the PC peripherals like the sound card or portrait card. These slots offer a connection between the tough disk and the laptop peripherals.
Troubleshooting a Bad Motherboard
Hardware diagnostics can be a pure pain in the ass. There is an excessive amount of happening to dissect the faulty stuff and repair it correctly. This is why experts or hobbyists usually achieve maximum restoration work. It takes a long time to get a complete grip on dealing with hardware problems with precision. That said, there are a few not-unusual troubles with quite easy answers. Let’s have to take a look at the MoBo (motherboard) itself for any repair options.
READ MORE :
- 8 Tips to Teach You How to Get a Finance Job With No Experience
- How to Use a BlackBerry without the Trackball
- Negative Effects of Video Games: It’s Worse Than You Thought
- Best Computer Games
- Know-How to Promote Your Blog: We Give You Smart Strategies
Replacing Capacitors
The steady hassle of popping capacitors is well-known by experts and lovers alike. Capacitors are the first thing to blow in a properly-built electronic unit. The problem persists anyplace a capacitor is used (typically called the ‘Capacitor Plague’). The only option is to replace the capacitor with a new one. Spotting an awful capacitor is easy: only with the bulging top and leaking electrolytic goo. Most capacitors expel the electrolytic fluid inside them. It dries up at the outer part of the top of the capacitor or leaks onto the circuit board. In the worst-case situation, the capacitor explodes because of excessive electrical strain. If you spot no damage on them, you may look at them using an ability gauge or a multimeter.
To update the capacitors, you may need:
a software-managed soldering station with each soldering and de-soldering iron,
actual capacitors of the identical capacity as the old ones and
experience in soldering and know-how of the threat involved.
Because one false circulates, you’ll harm the inner circuitry of the board and lose the board. You need to de-solder the pins from below the board, take the lifeless capacitor out, position the new one in, and solder the pins back; it is a multi-functional shot. It would help if you were extraordinarily cautious about the capacitor’s polarity. If you put it incorrectly, the capacitor pops up nearly as soon as you turn it on.
Motherboard Component Diagnosis
POST Check With Beep Codes
To diagnose a hassle, you need to recognize where to look. The first forestall will be the BIOS POST (Power-On Self-Test). If your PC (not your audio system, your cabinet) makes beeping sounds while you begin it up, there may be a problem with positive component/s on the MoBo. This is ideal (extraordinarily speaking) because the beeps will, without delay, let you know what’s wrong. Pay close attention to the kind of beeping sound (the duration – quick or lengthy and the wide variety of beeps). Search online for the ‘PC beep code,’ and you must determine which thing is faulty. This will only work if the elements are on the verge of happening. If something does cross down, your laptop, in all likelihood, will not begin, and you may need to parent out the trouble manually.
Manual Diagnosis and Repair
If your computer continues crashing or refuses to boot, you’ll have to become aware of and counter the trouble by inspecting each component at the MoBo for my part.
PSU
Diagnosis:
The Power Supply Unit is the most common thing to blow out. This is one purpose why most hardware upkeep people bring spare PSUs anywhere they go. Detecting a PSU failure is easy, too. If your PC may not start when you turn it on, the fault nearly usually lies inside the PSU. Check the power socket you’ve plugged your PC into or the surge protector (maximum beneficial, instead of delay connecting to the energy supply). It is attached well and works. If your supply is ideal and the power cables are checked nicely, it is your PSU.
Solution:
Replacing it is simple: open the cabinet, test out the model (typically the same, the brand and exceptional adjustments), and purchase the new one. Remember what is going where you’re taking out the old PSU and healthy the new one equally.
Video Adapter
Diagnosis:
Also referred to as the video card or the pics card, the adapter places all the pix to your reveal. If the PSU is first-rate, check this element subsequently. If your laptop turns on, the keyboard is responsive (press the ‘num lock’ key. The respective mild should turn on); however, if you do not see anything on the monitor (powered on), your snapshot card is busted.
Solution:
The solution may be as easy as updating the driver to something like baking the card in the oven to reconnect the solder joints. The latter is an ultimate-ditch effort as destroying your card and oven was dangerous! The problem may also be overheating, dirt series (maximum commonplace issues), and a defective construct and solder disconnection. Static discharge is another trouble that I’ll discuss later. If it is overheating or dusting, clean the card and its heatsink to ensure it works well. In the case of some other hassle, you’ll have to update the cardboard or attempt the oven trick. But I strongly endorse not doing it now if you don’t know how, and it’s only a brief degree. The card will die out eventually.
RAM
Diagnosis:
The typical signs of RAM failure are the BSoD (Blue Screen of Death), low computing speeds, and sluggish booting. The first step is to check whether the RAM is inserted nicely into the slot. If the RAM modules are improperly inserted, they must be checked. If the RAM is positioned properly or your PC isn’t always working, trade the RAM.
Solution:
RAMs are also prone to harm due to strong surges and static discharge. Replacing them is incredibly cheaper and less complicated, so this might not be too horrific if they occur.
Power Connections
Diagnosis:
If the RAM is placed and operating nicely, test whether the CPU is inserted perfectly in its socket. One of the CPU leads may not be inserted in the socket properly, especially if you have upgraded your CPU. The warmth sink module inside the cupboard is mounted upon the CPU, so one of the CPU leads may be bent because of the weight of the warmth sink.
Solution:
Check whether or not the CPU leads are well inserted in their respective sockets. If you cannot insert the leads well inside the socket, the socket is probably faulty, or your CPU isn’t always ideal on your PC motherboard.
Secondary Solutions and Additional Precautions
Flashing the BIOS
This is every other way to repair the trouble. However, there are some significant things you need to know about it. Firstly, you want to affirm that the problem lies inside the firmware, not the MoBo hardware or its components. Iby this is achieved by testing every part for power and procedure output. You must also confirm whether all the capacitors on the MoBo are functioning. Secondly, the system itself is very, very unstable if no longer carried out properly. That’s because the BIOS is important when beginning your laptop nicely. A terrible BIOS chip or firmware means an unbootable PC. To flash the BIOS, you want the firmware’ photograph.’ The procedure equals upgrading your BIOS to a more recent or identical model.
It’s called ‘flashing’ because the firmware is stored within the flash memory.
To try this, you first have to check which corporation your BIOS is from and the variety of its versions.
Then, you must go to their website, search for your model, and look for application upgrades. Store the code on a CD or a USB flash drive. Insert the CD/USB drive and reboot your PC. The power’s executable file will begin, after which you can follow the instructions on the display screen.
The method takes about 10 seconds. Another problem is that if there’s an energy failure for the duration of the improved system, you are in danger of having incomplete code on the BIOS, ruining it. The procedure itself is pretty easy, but I strongly propose you not try this unless you comprehend it’s the most effective answer because the risks are too excessive.
Static Discharge
Static strength can easily damage a circuit board as it causes a small electricity surge sufficient to kill the fragile circuit. You consequently want to take two precautions:
The first one is to provide the right grounding to the energy outlet to which the PC is hooked. An unearthed terminal is awful for the PC.
The other problem is human touch with the boards. Every time you immediately touch the metal in the cupboard or the forums, even while tinkering with them, your chance is to run a static modern-day via them. This modern is generated while your socks or hairbrush are on the carpet or the couch, so touching something metallic apart from the PC is suitable before managing its parts.
Always consider maintaining a backup of all your facts before you manage computer additives. Additionally, in no way attempt to repair something you assume is broken. Always verify the problem, then fix it. It is higher if you try all this with an old MoBo. It becomes a good way to get to know and enjoy earlier than you move on to stuff like repairing or customizing your contemporary computer.


